Thursday, January 30, 2014

Python dictionaries

https://yuji.wordpress.com/2008/05/14/python-basics-of-python-dictionary-and-looping-through-them/


http://stackoverflow.com/questions/16772071/sort-dict-by-value-python

To get the values use
sorted(data.values())
To get the matching keys, use a key function
sorted(data, key=data.get)
To get a list of tuples ordered by value
sorted(data.items(), key=lambda x:x[1])
 
http://stackoverflow.com/questions/15785719/how-to-print-a-dictionary-line-by-line-in-python 
 
 
python-how-to-print-a-dictionarys-key 
 
for key, value in mydic.items() :
    print (key, value) 
 
watch-out-for-listdictkeys-in-python-3 
One of the reasons why someone might actually opt to perform a more expensive copying operation is because, with the pre-3.0 semantics, the keys() method is atomic,
 in the sense that the whole operation of converting all dictionary keys
 to a list is done while the global interpreter lock is held. Thus, it’s
 thread-safe to run dict.keys() with Python 2.X. 
 
iterating-over-dictionary-items-values-keys-in-python-3 
In Python 3, keys() returns a dict_keys object but if we use it in a for loop context for k in d.keys() then an iterator is implicitly created. So the difference between for k in d.keys() and for k in iter(d.keys()) is one of implicit vs. explicit creation of the iterator.
 
Revamping dict.keys(), .values() and .items()
 list(args.keys()) => []
 list(args.keys) => TypeError: 'builtin_function_or_method' object is not iterable 
args.keys is an iterator... 
 
Get the list "iterator"
>>> args.keys()
dict_keys(['WORKSPACE_REGRESSION_ROOT', '--runalltests', '--testsuite', 'TESTTYPE', 'TESTNAME', '--regression_workspace', '--testname', 'TESTSUITE', '--testtype']) 
 
Get the list  
>>> list(args.keys())
['WORKSPACE_REGRESSION_ROOT', '--runalltests', '--testsuite', 'TESTTYPE', 'TESTNAME', '--regression_workspace', '--testname', 'TESTSUITE', '--testtype'] 
 
Print the list
>>> '.'.join((args.keys()))
'WORKSPACE_REGRESSION_ROOT.--runalltests.--testsuite.TESTTYPE.TESTNAME.--regression_workspace.--testname.TESTSUITE.--testtype'
 
converting-python-dictionary-to-list 
Converting from dict to list is made easy in Python. Three examples:
>> d = {'a': 'Arthur', 'b': 'Belling'}

>> d.items()
[('a', 'Arthur'), ('b', 'Belling')]

>> d.keys()
['a', 'b']

>> d.values()
['Arthur', 'Belling']


Tuesday, January 21, 2014

Emacs Django

http://from-the-cloud.com/en/emacs/2013/01/28_emacs-as-a-django-ide-with-python-djangoel.html

https://code.djangoproject.com/wiki/Emacs


After you open a project with M-x python-django-open-project
a .settings file will appear.
  1. set the project path and settings module correctly 
  •  
  1. you'll see a tree that contains all INSTALLED\APPS, TEMPLATE\DIRS and MEDIA\ROOT and STATIC\ROOT directories.

https://docs.djangoproject.com/en/dev/topics/settings/
A Django settings file contains all the configuration of your Django installation. This document explains how settings work and which settings are available.

http://www.rdegges.com/the-perfect-django-settings-file/
Zenburn themehttp://slinky.imukuppi.org/zenburnpage/

http://caisah.info/emacs-for-python/

Choose your Emacs theme

Use M-x customize-themes and try some themes. Chose one you like. If you don’t like any of the default ones, you can also install your theme using package.
Some popular themes are Zenburn themes. To install them, press M-x package-install zenburn-theme (First M-x Package-install, press Enter and then zenburn-theme. From now on this will be the preferred way of writing composed key shortcuts.) To load it automatically on Emacs startup, add this to your .emacs file:
(load-theme 'zenburn t)

https://github.com/bbatsov/solarized-emacs 

Install solarized like this:M-x package-install solarized-theme
Afterwards - business as usual, just load one of the theme variants with M-x load-theme.


Emacs Tuning

Emacs ECB

http://stackoverflow.com/questions/9998202/first-steps-after-activating-ecb-first-time


Debugger entered--Lisp error: (void-variable senator-tag-ring)
  (ring-empty-p senator-tag-ring)
  (not (ring-empty-p senator-tag-ring))
  redisplay_internal\ \(C\ function\)()
  message("ECB %s uses CEDET %s (contains semantic %s, eieio %s, speedbar %s)." "2.40" "2.0" "2.2" "1.4" "")
  byte-code("\306\307!\210\306\310!\210\306\311!\210\306\312!\210 \203$


Allternate python emacs solutions...

http://www.alandmoore.com/blog/2013/07/31/python-code-completion-in-emacs-at-last/

http://joat-programmer.blogspot.com/

http://utkarshsengar.com/2011/06/emacs-python/

http://caisah.info/emacs-for-python/

http://gabrielelanaro.github.io/emacs-for-python/

https://github.com/nickpascucci/DotEmacs

http://nickpascucci.com/

https://github.com/gabrielelanaro/emacs-for-python

http://www.seaandsailor.com/emacs-config.html

Jedi masters comments on jedi issues

http://www.kurup.org/blog/2012/10/24/emacs-for-python-programming/

https://github.com/jorgenschaefer/elpy

http://www.atlanticdynamic.com/guide-to-using-virtualenv-and-python/

http://tkf.github.io/emacs-ipython-notebook/#ein:jedi-setup

http://zmjones.com/mac-setup/


Monday, January 20, 2014

Emacs directory local variables

Setting up Emacs autocompletion for Python

First read the instructions at 
http://www.drlock.com/blog/2013/01/29/emacs-as-a-python-ide-jedi/ 
-the blog is missing the Emacs el-get step up steps

Use Mr. Batsov's excellent el-get and package instructions.
-Stop when you get the jedi installation.

Then use Mr. Lock's simple jedi installation instructions.

Read step 13!!!!!

Voila, python autocompletion is working.

May need to try Emacs prelude next.

The main problem that I encountered was in emacs after loading the virtualenv and a python file:

ImportError: No module named Jedi
https://github.com/tkf/emacs-jedi/issues/87

M-x epc:pop-to-last-server-process-buffer

Traceback (most recent call last):
  File "/home/--/.emacs.d/elpa/jedi-20130714.1228/jediepcserver.py", line 315, in
    main()
  File "/home/---/.emacs.d/elpa/jedi-20130714.1228/jediepcserver.py", line 311, in main
    jedi_epc_server(**vars(ns))
  File "/home/---/.emacs.d/elpa/jedi-20130714.1228/jediepcserver.py", line 211, in jedi_epc_server
    import_jedi()
  File "/home/---/.emacs.d/elpa/jedi-20130714.1228/jediepcserver.py", line 259, in import_jedi
    import jedi
ImportError: No module named 'jedi'

Lets try cleaning the jedi directory.

[jedi-20130714.1228]$ make clean requirements
rm -rf env
rm -rf elpa
rm -rf *.elc
VIRTUALENV_SYSTEM_SITE_PACKAGES=true virtualenv --python=python env
Already using interpreter /usr/bin/python
Using base prefix '/usr'
New python executable in env/bin/python
Installing setuptools, pip...done.
env/bin/pip install --use-mirrors --requirement requirements.txt
make: env/bin/pip: Command not found
make: *** [requirements] Error 127


 jedi-20130714.1228]$ make requirements
env/bin/pip install --use-mirrors --requirement requirements.txt
make: env/bin/pip: Command not found
make: *** [requirements] Error 127
[jedi-20130714.1228]$ ls
env/  jedi-autoloads.el  jedi-autoloads.el~  jedi.el  jedi.elc  jediepcserver.py  jedi-pkg.el  jedi-pkg.elc  Makefile  requirements.txt
[jedi-20130714.1228]$ ls env/bin
activate  activate.csh  activate.fish  activate_this.py  python*  python3@  python3.3@
[jedi-20130714.1228]$ pwd
/home/----/.emacs.d/elpa/jedi-20130714.1228

The problem is that pip is missing from the jedi virtualenv....

[ jedi-20130714.1228]$ ls ~/.emacs.d/elpa/jedi-20130714.1228env/bin/
activate  activate.csh  activate.fish  activate_this.py  python*  python3@  python3.3@
[ jedi-20130714.1228]$ ls ~/.virtualenvs/startproject/bin/
__pycache__/  activate.csh   activate_this.py  easy_install*      get_env_details*  pip3*    postactivate*    preactivate*    python*   python3.3@
activate      activate.fish  django-admin.py*  easy_install-3.3*  pip*              pip3.3*  postdeactivate*  predeactivate*  python3@

How is pip added to env/bin?


0. Install the required Python tools.
From:  http://www.drlock.com/blog/2013/01/29/emacs-as-a-python-ide-jedi/
  • easy_install jedi
  • easy_install epc
1. Install el-get
Wikemacs El-get
-add the Elisp code at the link to your ~/.emacs
-and execute it :
    M-x eval-current-buffer
-now wait a really long time for El-get to install.

2. Install ELPA if you have not already done so.
Follow the ELPA installation instructions at
http://www.emacswiki.org/emacs/ELPA

3. Add the MELPA repo
To add the repository put this before the call to package-initialize in your init.el file.
(require 'package) 
 
(add-to-list 'package-archives
  '("melpa" . "http://melpa.milkbox.net/packages/") t)
 
(add-to-list 'package-archives
             '("marmalade" . "http://marmalade-repo.org/packages/") t)
 
4. package.el
All fresh Emacses are coming with package.el that simplifies installation of 3rd party packages. auto-complete and ac-dabbrev are available from MELPA package repository. Read install instructions on MELPA site, or about package.el/ELPA in more details

Installation instructions from
http://batsov.com/articles/2012/02/19/package-management-in-emacs-the-good-the-bad-and-the-ugly/

(require 'package)
(package-initialize)
Put this snippet of code near the beginning of your Emacs config, since you’ll definitely want packages installed via package.el to be initalized before you start tweaking them.
With el-get you have access to 536 packages from the get-go, and
all of emacswiki (that’s currently more than 1700 packages) after
you’ve done M-x el-get-emacswiki-refresh. As of writing this comment,
my M-x el-get-package-list contains 2106 packages ready to install,
almost all with descriptions.
5. My ~/.emacs header

;;;;;;;;;;;;;;;;;;;;;;;;;;;;;;;;;;;;;;;;;;;;;;;;;;;;;;;;;;;;;;
;; http://batsov.com/articles/2012/02/19/package-management-in-emacs-the-good-the-bad-and-the-ugly/
;;
;; The magic starts with the command M-x package-list-packages.
;;
;;
;;
;;;;;;;;;;;;;;;;;;;;;;;;;;;;;;;;;;;;;;;;;;;;;;;;;;;;;;;;;;;;;;

(require 'package)
(require 'package)

(add-to-list 'package-archives
  '("melpa" . "http://melpa.milkbox.net/packages/") t)

(add-to-list 'package-archives
             '("marmalade" . "http://marmalade-repo.org/packages/") t)

(package-initialize)

;;;;;;;;;;;;;;;;;;;;;;;;;;;;;;;;;;;;;;;;;;;;;;;;;;;;;;;;;;;;;;

;;;;;;;;;;;;;;;;;;;;;;;;;;;;;;;;;;;;;;;;;;;;;;;;;;;
;; http://www.emacswiki.org/emacs/ELPA
;;;;;;;;;;;;;;;;;;;;;;;;;;;;;;;;;;;;;;;;;;;;;;;;;;;

(setq package-archives '(("gnu" . "http://elpa.gnu.org/packages/")
                         ("marmalade" . "http://marmalade-repo.org/packages/")
                         ("melpa" . "http://melpa.milkbox.net/packages/")))

;;;;;;;;;;;;;;;;;;;;;;;;;;;;;;;;;;;;;;;;;;;;;;;;;;;
;; http://wikemacs.org/index.php/El-get
;;;;;;;;;;;;;;;;;;;;;;;;;;;;;;;;;;;;;;;;;;;;;;;;;;;

(add-to-list 'load-path "~/.emacs.d/el-get/el-get")

(unless (require 'el-get nil t)
  (url-retrieve
   "https://raw.github.com/dimitri/el-get/master/el-get-install.el"
   (lambda (s)
     (end-of-buffer)
     (eval-print-last-sexp))))

;;;;;;;;;;;;;;;;;;;;;;;;;;;;;;;;;;;;;;;;;;;;;;;;;;;;;;;;;;;;;;;;;;;;;;;;;;;;
;; http://batsov.com/articles/2012/02/19/package-management-in-emacs-the-good-the-bad-and-the-ugly/
;;  instantly deploy packages on any OS/machine
;;
;;  find the packages that you want with
;;  M-x package-list-packages
;;
;;  Add them to the list below
;;
;;  The next time you run emacs they will be added automatically
;;
;;;;;;;;;;;;;;;;;;;;;;;;;;;;;;;;;;;;;;;;;;;;;;;;;;;;;;;;;;;;;;;;;;;;;;;;;;;;

(defvar prelude-packages
  '(virtualenv ;; needed by python deps so put it first
    virtualenvwrapper
    python-environment
    epc
    ac-dabbrev
    auto-complete
    erlang
    elpy
    jedi
    jedi-direx
    )
  "A list of packages to ensure are installed at launch.")

;;    flake
;;    pymacs
;;    pytest
;;    pylint
;;    py-import-check
;;    python
;;    python-mode
;;    python-pylint
;;    python-django
;;    python-info
;;    python-magic
;;    pyvirtualenv
;;    scala-mode

(defun prelude-packages-installed-p ()
  (loop for p in prelude-packages
        when (not (package-installed-p p)) do (return nil)
        finally (return t)))

(unless (prelude-packages-installed-p)
  ;; check for new packages (package versions)
  (message "%s" "Emacs Prelude is now refreshing its package database...")
  (package-refresh-contents)
  (message "%s" " done.")
  ;; install the missing packages
  (dolist (p prelude-packages)
    (when (not (package-installed-p p))
      (message "installing package %s\n" p)
      (package-install p))))

(provide 'prelude-packages)
;;; prelude-packages.el ends here

;;;;;;;;;;;;;;;;;;;;;;;;;;;;;;;;;;;;;;
;; https://github.com/kiwanami/emacs-epc
;;;;;;;;;;;;;;;;;;;;;;;;;;;;;;;;;;;;;;

(require 'epc)
(require 'jedi)

;;;;;;;;;;;;;;;;;;;;;;;;;;;;;;;;;;;;;;
;; Jedi setup
;;;;;;;;;;;;;;;;;;;;;;;;;;;;;;;;;;;;;;

;;Jedi
(autoload 'jedi:setup "jedi" nil t)
(setq jedi:setup-keys t)

(add-hook 'python-mode-hook
(lambda ()
(jedi:setup)
))

;;;;;;
NOTE: Check the messages at the time emacs loads for .emacs errors related to this header. Add your own packages to the list of packages to install.

6. Now open a new emacs
-the mini buffer should show the packages you specified in your ~/.emacs being downloaded and compiled
-All packages should be installed automatically

Note if you see this error there was a network connection error...:
Warning (initialization): An error occurred while loading `/home/---/.emacs':

error: Trying to parse HTTP response code in odd buffer:  *http melpa.milkbox.net:80*

To ensure normal operation, you should investigate and remove the
cause of the error in your initialization file.  Start Emacs with
the `--debug-init' option to view a complete error backtrace.
Then close emacs and reopen.

The elisp installation process will continue.

7. You can see the compilation of the elisp module in the Compile-Log buffer
Compiling file /home/---/.emacs.d/elpa/pymacs-0.25/pymacs-pkg.el at Mon Jan 20 22:36:13 2014
Entering directory `/home/---/.emacs.d/elpa/pymacs-0.25/'

Compiling file /home/---/.emacs.d/elpa/pymacs-0.25/pymacs.el at Mon Jan 20 22:36:13 2014

In pymacs-eval:
pymacs.el:201:21:Warning: `interactive-p' is an obsolete function (as of
    23.2); use `called-interactively-p' instead.

In pymacs-exec:
pymacs.el:211:21:Warning: `interactive-p' is an obsolete function (as of
    23.2); use `called-interactively-p' instead.

8. You can see the contents of the elp directory which contain the elisp code.
ls ~/.emacs.d/elpa
ac-dabbrev-20130906.518/       epc-20130803.2228/                   nose-20110804.619/                python-magic-20120505.1355/
ack-and-a-half-20130815.1917/  erlang-20131025.6/                   popup-20131230.544/               python-mode-6.1.2/
archives/                      find-file-in-project-20120716.1655/  py-import-check-20130802.411/     python-pylint-1.1/
auto-complete-20131128.233/    fuzzy-20131025.2343/                 pylint-20121112.435/              pyvirtualenv-1.1/
concurrent-20130914.536/       highlight-indentation-20131207.835/  pymacs-0.25/                      scala-mode-20131018.1325/
ctable-20131202.2114/          idomenu-20111122.1048/               pytest-0.2.1/                     virtualenv-20120930.1034/
deferred-20130930.607/         iedit-20131021.116/                  python-django-20131214.1841/      yasnippet-20140106.1009/
direx-20130930.1224/           jedi-20130714.1228/                  python-environment-20130624.339/  jedi-direx-readme.txt
elpy-20131109.1120/            jedi-direx-20130525.1039/            python-info-20130916.620/         jedi-readme.txt


9. List the packages in emacs
The magic starts with the command M-x package-list-packages. At this point you should see something in the lines of this.


10. Note: you can click on one of the packages in the installation list and check its installation status and location.
jedi is an installed package.

     Status: Installed in `/home/---/.emacs.d/elpa/jedi-20130714.1228/'.
    Version: 20130714.1228
   Requires: epc-0.1.0, auto-complete-1.4
    Summary: Python auto-completion for Emacs

[back]

11. Now configure virtualenv
i. M-x package-list-packages
ii. Cntl-s virtualenv
iii. Click on the virutalenv link in the package list buffer
iv. Now read the configuration instructions in the virtualenv *Help* buffer.
virtualenv is an installed package.

     Status: Installed in `/home/---/.emacs.d/elpa/virtualenv-20120930.1034/'.
    Version: 20120930.1034
    Summary: Virtualenv for Python

This is a minor mode for setting the virtual environment for the
Python shell using virtualenv and supports both python-mode.el and
python.el. This minor mode was inspired by an earlier
implementation by Jesse Legg and Jeremiah Dodds, however this code
is a complete re-write with a GPLv3 license consistent with
GNU Emacs and python-mode.el.

There are two ways to use virtualenv.
1) The quickest way to get started is to simply type:
     M-x virtualenv-workon
   Which will prompt you to enter the name of a directory in
   ~/.virtualenvs that contains your chosen environment. You can
   hit tab to show the available completions.

   You'll know that you're in virtualenv mode now when you see the
   name of the virtualenv you selected in brackets. So if I were to
   select my turbogears environment that I call tg2.1 then I would
   see [tg2.1] appear in the mode line. To make sure you're new
   python shell is set up correctly you can try running this little
   snippet of python code: Python 3+ code edits in red below

 >>> import os, sys
 >>> print (os.environ)
environ({'EMACS': 't',..)  <<< look for this
 >>> print sys.path
 ['', ...]   <<< look for this
2) The recommended way to use virtualenv minor mode is to use a
.dir-locals.el file in the root of your project directory, however that
requires Emacs 23.1 or higher. There are two buffer-local variables that you
can set for virtualenv as shown in this example:

in file /path/to/project/.dir-locals.el:
((nil . ((virtualenv-workon . "tg2.1")
        (virtualenv-default-directory . "/path/to/project/subdir"))))

The .dir-locals.el is new in Emacs23 and is useful for other
things, too. You should read the dir-locals docs to understand the
format. The variable virtualenv-workon should just be a string the
same as you'd give to the interactive function. The variable
virtualenv-default-directory is useful when you want to have your
python process rooted in a particular directory when it starts, so
that no matter where you are in your project's hierarchy, if you
launch a python shell. This method is recommended because it is
more flexible and will allow multiple virtualenvs running at once
in future versions.

[back]
dir-locals.el notes

Notes:

 virtualenv-workon will now modify Emacs' exec-path as well as the
 shell environment's PATH so that if you run shell-command or launch a
 command in an emacs subprocess it will use any commands it finds in
 your ~/.virtualenvs//bin directory.

 virtualenv-deactivate will restore exec-path and PATH back to their
 original state prior to using the virtualenv-workon command.
virtualenv.el

Emacs manual: Directory-Variables.html


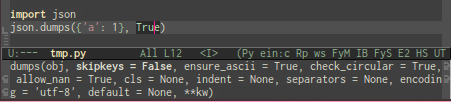
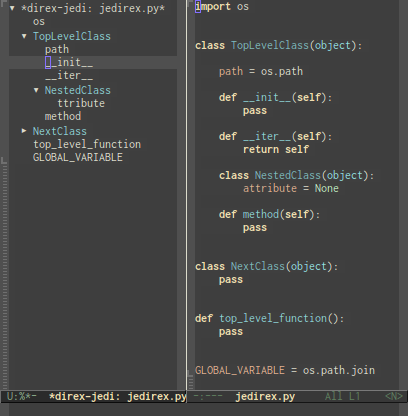
12. Screenshots from the emacs jedi site


13. The magic commands
-add pip jedi epc to the virtualenv 

http://qiita.com/yuu116atlab/items/2a62cb880ac863dcc8ef 
Execute these commands:
cd ~/.emacs.d/elpa/jedi-20130714.1228
virtualenv env
source env/bin/activate
sudo pip install jedi epc sexpdata pep8 pyflakes

 Downloading jedi-0.7.0.tar.gz (136kB): 136kB downloaded
  Running setup.py (path:/home/---/.emacs.d/elpa/jedi-20130714.1228/env/build/jedi/setup.py) egg_info for package jedi
   
    warning: no previously-included files matching '*.pyc' found under directory '*'
Downloading/unpacking epc
  Downloading epc-0.0.5.tar.gz
  Running setup.py (path:/home/---/.emacs.d/elpa/jedi-20130714.1228/env/build/epc/setup.py) egg_info for package epc
   
Downloading/unpacking sexpdata>=0.0.3 (from epc)
  Downloading sexpdata-0.0.3.tar.gz
  Running setup.py (path:/home/---/.emacs.d/elpa/jedi-20130714.1228/env/build/sexpdata/setup.py) egg_info for package sexpdata
   
Installing collected packages: jedi, epc, sexpdata
  Running setup.py install for jedi
   
    warning: no previously-included files matching '*.pyc' found under directory '*'
  Running setup.py install for epc
   
  Running setup.py install for sexpdata
   
Successfully installed jedi epc sexpdata
Cleaning up...


14. Stackoverflow troubleshooting help

15. Trying to parse HTTP response code in odd buffer: http melpa.milkbox.net:80
 https://github.com/purcell/emacs.d/issues/61
Warning (initialization): An error occurred while loading `~/.emacs.d/init.el':
error: Trying to parse HTTP response code in odd buffer: http melpa.milkbox.net:80
To ensure normal operation, you should investigate and remove the
cause of the error in your initialization file. Start Emacs with
the `--debug-init' option to view a complete error backtrace.

https://github.com/purcell/emacs.d/issues/61

16.

17. Python goodies
 http://joat-programmer.blogspot.com/

Saturday, January 18, 2014

Python 3 docs

http://docs.python.org/3.0

UNIX bash shell and interactive Python shell

http://forums.macrumors.com/showthread.php?t=477303

type your command at the SHELL PROMPT not Python interpreter prompt: open Terminal, 'cd' to your python script directory and type

Code:
$ python spam.py
If you want to execute python module in the interactive Python shell:
start python by typing
$ python
and type
Code:
>>> import spam
without '.py' file extension.

Your problems originates in mixing UNIX bash shell and interactive Python shell.

Friday, January 17, 2014

Syntax Highlighting with Blogger Engine

http://www.craftyfella.com/2010/01/syntax-highlighting-with-blogger-engine.html

http://alexgorbatchev.com/SyntaxHighlighter/manual/brushes/

hello Django

See theprevious blogs which explain how to setup  Django on Arch/Manjaro Linux.

mkvirtualenv hello_django/
cd ~/.virtualenvs/hello_django/
pip install django
django-admin.py startproject hello
cd hello

http://www.djangobook.com/en/2.0/chapter03.html

python manage.py runserver 127.0.0.1:8000

From:
http://docs.python.org/3.0/library/sys.html
Note: the django book example uses Python 2. To get this to work with Python 3 remove the print:
>>> print sys.version
  File "", line 1
    print sys.version
            ^
SyntaxError: invalid syntax
>>> sys.version
'3.3.2 (default, Sep  6 2013, 09:30:10) \n[GCC 4.8.1 20130725 (prerelease)]'

>>>


virtualenv

http://docs.python-guide.org/en/latest/dev/virtualenvs/


http://dabapps.com/blog/introduction-to-pip-and-virtualenv-python/

http://www.virtualenv.org/en/latest/virtualenv.html

1. Make the virtual environment
> mkvirtualenv hello_django/

2. Change to the new virtual environment
> virtualenv hello_django

3. Note that the prompt has changed to the new project virtual name

4. Change to the new virtual encvironment
> (hello_django)[derek@derek-laptop hello_django]$ cd ~/.virtualenvs/hello_django/

5. Deactivate the virtual environment

Usually, activating a virtualenv gives you a command:
$ deactivate
which puts things back to normal.

Django


http://net.tutsplus.com/tutorials/python-tutorials/python-from-scratch-creating-a-dynamic-website/

Python from Scratch – Create a Dynamic Website

 http://michal.karzynski.pl/blog/2013/06/09/django-nginx-gunicorn-virtualenv-supervisor/


http://net.tutsplus.com/tutorials/other/10-django-troublespots-for-beginners/

Installing and using elastic search and python pyes, django... on Arch/Manjaro Linux

sudo pacman -S pip
sudo  pip install pyes
sudo pip install django

$ python
Python 3.3.2 (default, Sep  6 2013, 09:30:10)
[GCC 4.8.1 20130725 (prerelease)] on linux
Type "help", "copyright", "credits" or "license" for more information.
>>> import django
>>> print(django.get_version())
1.6.1
>>>


The Django tutorial needs version 1.7.

https://docs.djangoproject.com/en/dev/intro/tutorial01/

This tutorial is written for Django 1.7 and Python 3.2 or later. If the Django version doesn’t match, you can refer to the tutorial for your version of Django by using the version switcher at the bottom right corner of this page, or update Django to the newest version. If you are still using Python 2.7, you will need to adjust the code samples slightly, as described in comments.

 Lets install the Python IDE erric and try it out

> sudo pacman -S eric

https://wiki.archlinux.org/index.php/Django

Hmmm...lets not upgrade django and lets usethe 1.6 tutorial

https://docs.djangoproject.com/en/1.6/intro/tutorial01/

> python -c "import django; print(django.get_version())"
1.6.1

> sudo ln -s /usr/lib/python3.3/site-packages/django/bin/django-admin.py /usr/local/bin
> django-admin.py startproject mysite

> cd mysite
 
> python manage.py runserver
Let’s look at what startproject created:
mysite/
    manage.py
    mysite/
        __init__.py
        settings.py
        urls.py
        wsgi.py
 
 
> cd mysite
 
> python manage.py runserver
 
View the site in the browser at http://127.0.0.1:8000/ 

It worked!

Congratulations on your first Django-powered page.

Of course, you haven't actually done any work yet. Next, start your first app by running  python manage.py startapp [appname].
You're seeing this message because you have DEBUG = True in your Django settings file and you haven't configured any URLs. Get to work!
 
Now lets try to connect elasticsearch to django
 
http://haystacksearch.org/ 

> sudo pip install django-haystack

http://rise3d.blogspot.com/2013/08/building-django-powered-website-django.html

Now lets try this:

http://www.jeffknupp.com/blog/2013/12/18/starting-a-django-16-project-the-right-way/

emacs ~/.bashrc.include&
export WORKON_HOME=$HOME/.virtualenvs
export PROJECT_HOME=$HOME/directory-you-do-development-in
source /usr/bin/virtualenvwrapper.sh


http://www.youtube.com/watch?v=zTNA0MtZwso
Python Web Development: Understanding Django for Beginners

More resources

http://blog.arisetyo.com/getting-started-with-python-elasticsearch-client/

http://www.elasticsearch.org/blog/unleash-the-clients-ruby-python-php-perl/#python

http://www.opencrowd.com/blog/post/elasticsearch-django-tutorial/

https://github.com/aparo/django-elasticsearch/blob/master/README.rst

http://spinscale.github.io/elasticsearch/2012-03-jugm.html#/36

http://andrewbrookins.com/tech/one-year-later-an-epic-review-of-pycharm-2-7-from-a-vim-users-perspective/

http://www.jetbrains.com/pycharm/download/index.html

http://media.readthedocs.org/pdf/django/latest/django.pdf

$ ls /usr/lib/python3.3/site-packages/django/bin/django-admin.py
/usr/lib/python3.3/site-packages/django/bin/django-admin.py

sudo ln -s /usr/lib/python3.3/site-packages/django/bin/django-admin.py /usr/local/bin

eric-IDE Tips & Tricks

Eric is a good IDE for Django. It has Highlighting, Autocompletion, CVS & Subversion, Debugger, and Breakpoints.
eric (Python 3) and eric4 (Python 2) can be installed from the official repositories.
To start a new Django Project.
First click on the "Project/new." Then under "Project Type" select Django. After your new django project has been created, Right-click on the "Project Viewer", to the Left, and select "Configure", and in the configuration window set "Project type" to Django.
After that, in eric4's "Settings/Preferences" select Django, from the left, and add this change to the "Console Command."
If KDE,
konsole --workdir `pwd` -e
konsole --workdir `pwd` --noclose -e
This will solve the problem...
/usr/bin/python2: can't open file 'manage.py': [Errno 2] No such file or directory
Note the "Django" menu next to "Project" and "Extras". There you will find Django tools to runserver and sync database.
Now, just play around with it a little. All your Python code will be Added to the first tab of the "Project-Viewer" and your html templates will be opened in the second tab.

Wednesday, January 15, 2014

Ecilpse Market Place and Java setup

1. Eclipse Market place setup
http://stackoverflow.com/questions/5285623/how-do-i-install-eclipse-marketplace-in-eclipse-classic

What they don't mention is some intermediaet steps.


Help → Install new Software → Switch to the Kepler Repository
type this in the "Work with" box: http://download.eclipse.org/releases/kepler

→ Expand General Purpose Tools → Click the Marketplace Client checkbox

click next and accept the license agrement.

2. Restart Eclipse and select the marketplace on the overview screen

Search for subclipse and install it.
Search for maven and install it


Sunday, January 12, 2014

Arch Linux HP printer installation

1. Switch Python from 3 to 2
>  su -
> rm /usr/bin/python
>  ln -s /usr/bin/python2 /usr/bin/python

2. Run the HP doctor program in a new termainal as a regular user and fix the problems
> hp-doctor
READ THE ENTIRE REPORT AND FIND THE PROBLEMS

2. Run the HP check program in a new termainal as a regular user and fix the problems
> hp-check -r


4. Note that HP setup complains about reportlab missing, so add it
> pacman -S python2-reportlab
Note: python2-pillow is in conflict with other hp deps so don't add it

5. Run in debug mode to see what is wrong
sudo hp-plugin -ldebug
-in my case the pgp key retreival was hanging
ping pgp.mit.edu
NO REPONSE
So I waited 30 minutes and reran-it worked

6. Rerun HP check
> hp-check -r
warning: Printer is not HPLIP installed. Printers must use the hp: or hpfax: CUPS backend for HP-Devices.

7. Reinstall the plugin
> hp-plugin
Enter option (d=download*, p=specify path, q=quit) ? d

8. Rerun HP check
> hp-check -r

9. Run HP setup again
>  hp-setup
test page printed

10. Restore python to python3
>  su -
> rm /usr/bin/python
>  ln -s /usr/bin/python3 /usr/bin/python

Alternate solution
http://foo2zjs.rkkda.com/
http://foo2zjs.rkkda.com/forum/read.php?70,3068,3068

Tuesday, January 7, 2014

Arch Linux Oracle (Sun) Java installation

1. Remove the open source Java
http://allencch.wordpress.com/2012/06/29/replacing-openjdk-with-jre-6-in-arch-linux/

[~]$ sudo pacman -Rndd jdk7-openjdk jre7-openjdk jre7-openjdk-headless icedtea-web-java7 java-rhino
error: target not found: java-rhino
[~]$ sudo pacman -Rndd jdk7-openjdk jre7-openjdk jre7-openjdk-headless icedtea-web-java7

Packages (4): icedtea-web-java7-1.4-2  jdk7-openjdk-7.u40_2.4.1-3  jre7-openjdk-7.u40_2.4.1-3  jre7-openjdk-headless-7.u40_2.4.1-3

Total Removed Size:   97.73 MiB

:: Do you want to remove these packages? [Y/n]
(1/4) removing icedtea-web-java7                                                                            [################################################################] 100%
(2/4) removing jdk7-openjdk                                                                                 [################################################################] 100%
(3/4) removing jre7-openjdk                                                                                 [################################################################] 100%
(4/4) removing jre7-openjdk-headless                                                                        [################################################################] 100%
[~]$


2. Install Sun Java
http://tutorialforlinux.com/2012/11/15/howtoinstall-oraclejdk7x64-archlinux2012gnome64bit/

http://www.oracle.com/technetwork/java/javase/downloads/jdk7-downloads-1880260.html