Monday, December 11, 2017

Highlighting source code in blogger

I have been lazy and did not highlight the source code in previous examples making them difficult to follow.

I am now using http://hilite.me and will highlight the source code in future posts so that they are not quite so cryptic.

To use hilite.me paste in the source code, select your options, click the Highlight! button, and copy the output in the HTML box at the right of the page to the HTML view of blogger. 

Scala/SPARK date string to timestamp conversion

https://databricks-prod-cloudfront.cloud.databricks.com/public/4027ec902e239c93eaaa8714f173bcfc/3741049972324885/3696710289009770/4413065072037724/latest.html

https://stackoverflow.com/questions/29844144/better-way-to-convert-a-string-field-into-timestamp-in-spark

Notes:
  1. Dates are checked for validity. 2017/11/31 is an invalid date. Nov. only has 30 days and a null is returned.
  2. Note the regex year, month, day order. It must match the date string in the input otherwise a null will be returned.
  3. $"date" is the date column from the dataframe "df".

 1
 2
 3
 4
 5
 6
 7
 8
 9
10
11
12
13
14
import org.apache.spark.sql.functions._ 
import org.apache.spark.sql.types._ 

val df = Seq( (1, "2014/01/01 23:00:01"), 
(1, "2016/12/29 09:54:00"), 
(1, "2016/05/09 10:12:43"), 
(1, "2014/11/30 10:12:43"), 
(1, "2014/11/31 12:40:32")).toDF("id", "date")

import org.apache.spark.sql.functions.to_timestamp 

val ts = to_timestamp($"date", "yyyy/MM/dd HH:mm:ss") 

df.withColumn("ts", ts).show(5, false)

Now lets replace the date column with the converted timestamp column.

What follows is not quite right.


 1
 2
 3
 4
 5
 6
 7
 8
 9
10
11
12
13
14
15
16
17
18
19
20
21
22
23
24
25
scala> val res = df.select($"id").show()
+---+
| id|
+---+
|  1|
|  1|
|  1|
|  1|
|  1|
+---+


scala> val res = df.select($"id", ts)
res: org.apache.spark.sql.DataFrame = [id: int, to_timestamp(`date`, 'yyyy/MM/dd HH:mm:ss'): timestamp]

scala> res.show()
+---+-------------------------------------------+
| id|to_timestamp(`date`, 'yyyy/MM/dd HH:mm:ss')|
+---+-------------------------------------------+
|  1|                        2014-01-01 23:00:01|
|  1|                        2016-12-29 09:54:00|
|  1|                        2016-05-09 10:12:43|
|  1|                        2014-11-30 10:12:43|
|  1|                                       null|
+---+-------------------------------------------+

.alias() is the key here to change the name of the new column to "date"


 1
 2
 3
 4
 5
 6
 7
 8
 9
10
11
12
13
14
15
16
scala> val ts = to_timestamp($"date", "yyyy/MM/dd HH:mm:ss").alias("date") 
ts: org.apache.spark.sql.Column = to_timestamp(`date`, 'yyyy/MM/dd HH:mm:ss') AS `date`

scala> val res = df.select($"id", ts)
res: org.apache.spark.sql.DataFrame = [id: int, date: timestamp]

scala> res.show()
+---+-------------------+
| id|               date|
+---+-------------------+
|  1|2014-01-01 23:00:01|
|  1|2016-12-29 09:54:00|
|  1|2016-05-09 10:12:43|
|  1|2014-11-30 10:12:43|
|  1|               null|
+---+-------------------+


Nvidia-docker build a modifed tensoflow gpu Dockerfile and create a new image references

https://www.pugetsystems.com/labs/hpc/Docker-and-NVIDIA-docker-on-your-workstation-Installation-903/

https://www.pugetsystems.com/labs/hpc/Docker-and-Nvidia-Docker-on-your-workstation-Common-Docker-Commands-Tutorial-926/

Lets say you want to create a user and an application directory in a Dockerfile that uses the latest Tensorflow GPU Docker image.

Check out Al Krauss's helpful create user and directory in a Dockerfile gist
-Thanks Al!

cd ~
git clone https://gist.github.com/alkrauss48/2dd9f9d84ed6ebff9240ccfa49a80662

mkdir nvidia-docker-mod
cp  ../2dd9f9d84ed6ebff9240ccfa49a80662/Dockerfile .

vi Dockerfile and add the following line at the top of the file.

FROM gcr.io/tensorflow/tensorflow:latest-gpu

# save the file

# Build the new Docker image
docker build -t nvidia-docker-mod .

# Run the new Docker image
$ nvidia-docker run -it nvidia-docker-mod   bash
app@3dfedb81f97c:~/my-project$ whoami
app
app@3dfedb81f97c:~/my-project$


Only run one Apache Spark spark-shell on a machine

Sunday, December 10, 2017

Google Tensorflow Docker images reference

Ubuntu 16.04 Nvidia Docker setup

1. Tensorflow compatible libs

https://www.tensorflow.org/versions/r0.12/get_started/os_setup

https://www.tensorflow.org/install/install_linux

2. Pre-installation actions

https://github.com/tensorflow/tensorflow/tree/master/tensorflow/tools/docker

https://developer.nvidia.com/cuda-downloads?target_os=Linux&target_arch=x86_64&target_distro=Ubuntu

http://docs.nvidia.com/cuda/cuda-installation-guide-linux/index.html#pre-installation-actions

3. Install the Nvidia driver

http://programmingmatrix.blogspot.com/2017/10/ubuntu-1604-nvidia-gpu-driver-cuda-and.html

http://docs.nvidia.com/cuda/cuda-installation-guide-linux/index.html#ubuntu-installation

4. Install Nvidia Docker
 
https://github.com/NVIDIA/nvidia-docker

GPU support

Prior to installing TensorFlow with GPU support, ensure that your system meets all NVIDIA software requirements. To launch a Docker container with NVidia GPU support, enter a command of the following format:
$ nvidia-docker run -it -p hostPort:containerPort TensorFlowGPUImage
where:
  • -p hostPort:containerPort is optional. If you plan to run TensorFlow programs from the shell, omit this option. If you plan to run TensorFlow programs as Jupyter notebooks, set both hostPort and containerPort to 8888.
  • TensorFlowGPUImage specifies the Docker container. You must specify one of the following values:
    • gcr.io/tensorflow/tensorflow:latest-gpu, which is the latest TensorFlow GPU binary image.
    • gcr.io/tensorflow/tensorflow:latest-devel-gpu, which is the latest TensorFlow GPU Binary image plus source code.
    • gcr.io/tensorflow/tensorflow:version-gpu, which is the specified version (for example, 0.12.1) of the TensorFlow GPU binary image.
    • gcr.io/tensorflow/tensorflow:version-devel-gpu, which is the specified version (for example, 0.12.1) of the TensorFlow GPU binary image plus source code.
We recommend installing one of the latest versions. For example, the following command launches the latest TensorFlow GPU binary image in a Docker container from which you can run TensorFlow programs in a shell:
$ nvidia-docker run -it gcr.io/tensorflow/tensorflow:latest-gpu bash
The following command also launches the latest TensorFlow GPU binary image in a Docker container. In this Docker container, you can run TensorFlow programs in a Jupyter notebook:
$ nvidia-docker run -it -p 8888:8888 gcr.io/tensorflow/tensorflow:latest-gpu
The following command installs an older TensorFlow version (0.12.1):
$ nvidia-docker run -it -p 8888:8888 gcr.io/tensorflow/tensorflow:0.12.1-gpu
Docker will download the TensorFlow binary image the first time you launch it. For more details see the TensorFlow docker readme.

Next Steps

You should now validate your installation.

5. Test that tensorflow links with libcudnn

workon deep learning_3.5
python
>>> import tensorflow

6. Check the Tensorflow version

python -c "import tensorflow; print(tensorflow.__version__)"

7. Test that Tensorflow is using the GPU

python -c "import tensorflow as tf; sess = tf.Session(config=tf.ConfigProto(log_device_placement=True))"

8. Setup a Docker volume for persistence

https://github.com/anurag/fastai-course-1


9. How to use Nvidia Docker

https://medium.com/@ceshine/docker-nvidia-gpu-nvidia-docker-808b23e1657

Sunday, December 3, 2017

Another set of Kafka Confluent examples

http://cloudurable.com/blog/kafka-tutorial-kafka-from-command-line/index.html

Install Confluent kafka

cd ~/confluent-3.3.1/bin

$ ./kafka-console-producer     --broker-list localhost:9092 -topic fizzbuzz
>msg 1
>msg 2
>msg 3
>msg 4
>^C

$ ./kafka-console-consumer     --bootstrap-server localhost:9092     --topic fizzbuzz --from-beginning
testing
the message sending

msg 1
msg 2
msg 3

msg 4

Friday, December 1, 2017

elpy problem on emacs25 and Ubuntu 16.04

Updated espy, etc, jedi installation + Magit


1. create a virtualenv and activate it with workon

2. pip install jedi flake8 importmagic autopep8 epc yapf ipython

3. https://realpython.com/blog/python/emacs-the-best-python-editor/

4. elpy
https://elpy.readthedocs.io/en/latest/ide.html

5. Magit
https://www.masteringemacs.org/article/introduction-magit-emacs-mode-git

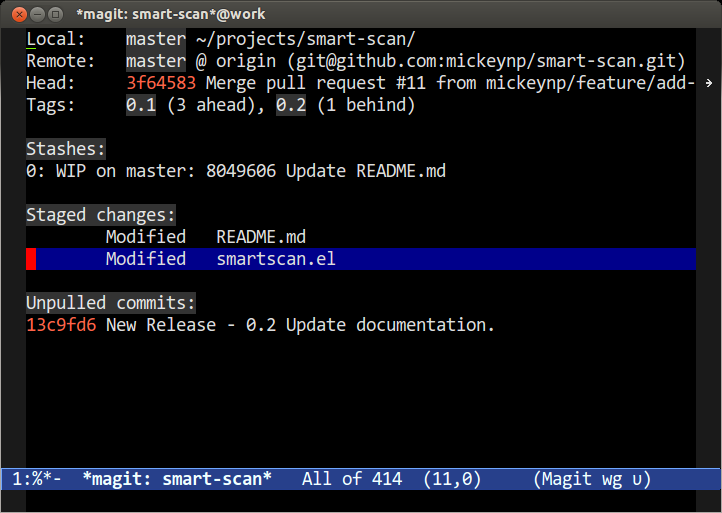
To use Magit you must do it through M-x magit-status.
The Magit Status
An example of Magit’s status window

6. penv
https://github.com/pyenv/pyenv#installation

https://smythp.com/emacs/python/2016/04/27/pyenv-elpy.html

7. Emacs repo
https://github.com/derek-pappas/emacs


https://www.skorks.com/2009/09/bash-shortcuts-for-maximum-productivity/

Use up/down arrow to scroll through the command history.

Esc-d to delete the next word.

Bash Shortcuts For Maximum Productivity

MaximumIt may or may not surprise you to know that the bashshell has a very rich array of convenient shortcutsthat can make your life, working with the command line, a whole lot easier. This ability to edit the command line using shortcuts is provided by the GNU Readline library. This library is used by many other *nix application besides bash, so learning some of these shortcuts will not only allow you to zip around bash commands with absurd ease :), but can also make you more proficient in using a variety of other *nix applications that use Readline. I don’t want to get into Readline too deeply so I’ll just mention one more thing. By default Readline uses emacs key bindings, although it can be configured to use the vi editing mode, I however prefer to learn the default behavior of most applications (I find it makes my life easier not having to constantly customize stuff). If you’re familiar with emacs then many of these shortcuts will not be new to you, so these are mostly for the rest of us :).

Command Editing Shortcuts

  • Ctrl + a – go to the start of the command line
  • Ctrl + e – go to the end of the command line
  • Ctrl + k – delete from cursor to the end of the command line
  • Ctrl + u – delete from cursor to the start of the command line
  • Ctrl + w – delete from cursor to start of word (i.e. delete backwards one word)
  • Ctrl + y – paste word or text that was cut using one of the deletion shortcuts (such as the one above) after the cursor
  • Ctrl + xx – move between start of command line and current cursor position (and back again)
  • Alt + b – move backward one word (or go to start of word the cursor is currently on)
  • Alt + f – move forward one word (or go to end of word the cursor is currently on)
  • Alt + d – delete to end of word starting at cursor (whole word if cursor is at the beginning of word)
  • Alt + c – capitalize to end of word starting at cursor (whole word if cursor is at the beginning of word)
  • Alt + u – make uppercase from cursor to end of word
  • Alt + l – make lowercase from cursor to end of word
  • Alt + t – swap current word with previous
  • Ctrl + f – move forward one character
  • Ctrl + b – move backward one character
  • Ctrl + d – delete character under the cursor
  • Ctrl + h – delete character before the cursor
  • Ctrl + t – swap character under cursor with the previous one

Command Recall Shortcuts

  • Ctrl + r – search the history backwards
  • Ctrl + g – escape from history searching mode
  • Ctrl + p – previous command in history (i.e. walk back through the command history)
  • Ctrl + n – next command in history (i.e. walk forward through the command history)
  • Alt + . – use the last word of the previous command

Command Control Shortcuts

  • Ctrl + l – clear the screen
  • Ctrl + s – stops the output to the screen (for long running verbose command)
  • Ctrl + q – allow output to the screen (if previously stopped using command above)
  • Ctrl + c – terminate the command
  • Ctrl + z – suspend/stop the command

Bash Bang (!) Commands

Bash also has some handy features that use the ! (bang) to allow you to do some funky stuff with bash commands.
  • !! – run last command
  • !blah – run the most recent command that starts with ‘blah’ (e.g. !ls)
  • !blah:p – print out the command that !blah would run (also adds it as the latest command in the command history)
  • !$ – the last word of the previous command (same as Alt + .)
  • !$:p – print out the word that !$ would substitute
  • !* – the previous command except for the last word (e.g. if you type ‘find some_file.txt /‘, then !* would give you ‘find some_file.txt‘)
  • !*:p – print out what !* would substitute
There is one more handy thing you can do. This involves using the ^^ ‘command’. If you type a command and run it, you can re-run the same command but substitute a piece of text for another piece of text using ^^ e.g.:
$ ls -al
total 12
drwxrwxrwx+ 3 Administrator None    0 Jul 21 23:38 .
drwxrwxrwx+ 3 Administrator None    0 Jul 21 23:34 ..
-rwxr-xr-x  1 Administrator None 1150 Jul 21 23:34 .bash_profile
-rwxr-xr-x  1 Administrator None 3116 Jul 21 23:34 .bashrc
drwxr-xr-x+ 4 Administrator None    0 Jul 21 23:39 .gem
-rwxr-xr-x  1 Administrator None 1461 Jul 21 23:34 .inputrc
$ ^-al^-lash
ls -lash
total 12K
   0 drwxrwxrwx+ 3 Administrator None    0 Jul 21 23:38 .
   0 drwxrwxrwx+ 3 Administrator None    0 Jul 21 23:34 ..
4.0K -rwxr-xr-x  1 Administrator None 1.2K Jul 21 23:34 .bash_profile
4.0K -rwxr-xr-x  1 Administrator None 3.1K Jul 21 23:34 .bashrc
   0 drwxr-xr-x+ 4 Administrator None    0 Jul 21 23:39 .gem
4.0K -rwxr-xr-x  1 Administrator None 1.5K Jul 21 23:34 .inputrc
Here, the command was the ^-al^-lash which replaced the –al with –lash in our previous ls command and re-ran the command again.
There is lots, lots more that you can do when it comes to using shortcuts with bash. But, the shortcuts above will get you 90% of the way towards maximum bashproductivity. If you think that I have missed out on an essential bash shortcut that you can’t live without (I am sure I have), then please let me know and I’ll update the post. As usual, feel free to subscribe to my feed for more tips and opinions on all things software development.

Tuesday, November 28, 2017

Sublime installation on Ubuntu 16.04 reference

https://www.sublimetext.com/docs/3/linux_repositories.html#apt
wget -qO - https://download.sublimetext.com/sublimehq-pub.gpg | sudo apt-key add -
sudo apt-get install apt-transport-https
echo "deb https://download.sublimetext.com/ apt/stable/" | sudo tee /etc/apt/sources.list.d/sublime-text.list
sudo apt-get update
sudo apt-get install sublime-text

https://realpython.com/blog/python/setting-up-sublime-text-3-for-full-stack-python-development/

Sublime Anaconda config
https://github.com/DamnWidget/anaconda#anaconda-autocompletion

http://damnwidget.github.io/anaconda/IDE/

http://damnwidget.github.io/anaconda/anaconda_settings/ 

Thursday, November 16, 2017

Scala Conscript, giter8, and set

brew update && brew install giter8

or

http://www.foundweekends.org/conscript/setup.html

http://www.foundweekends.org/giter8/setup.html

https://github.com/foundweekends/giter8/wiki/giter8-templates

http://www.scala-sbt.org/0.13/docs/Installing-sbt-on-Linux.html

# setup scala

sbt new scala/scala-seed.g8

# example sbt layout

https://github.com/kyrsideris/SparkUpdateCassandra


Wednesday, November 15, 2017

Spark: Read JSON references

Nginx log file proceeding in ELK - reference


https://logz.io/blog/nginx-log-analysis/

A sample NGINX access log entry:

  1. 109.65.122.142 - - [10/Nov/2015:07:06:59 +0000] "POST /kibana/elasticsearch/_msearch?timeout=30000&ignore_unavailable=true&preference=1447070343481 HTTP/1.1" 200 8352 "https://app.logz.io/kibana/index.html" "Mozilla/5.0 (X11; Linux armv7l) AppleWebKit/537.36 (KHTML, like Gecko) Ubuntu Chromium/45.0.2454.101 Chrome/45.0.2454.101 Safari/537.36" 0.465 0.454

The Logstash configuration to parse that NGINX access log entry:

  1. grok {
  2. match => [ "message" , "%{COMBINEDAPACHELOG}+%{GREEDYDATA:extra_fields}"]
  3. overwrite => [ "message" ]
  4. }
  5.  
  6. mutate {
  7. convert => ["response", "integer"]
  8. convert => ["bytes", "integer"]
  9. convert => ["responsetime", "float"]
  10. }
  11.  
  12. geoip {
  13. source => "clientip"
  14. target => "geoip"
  15. add_tag => [ "nginx-geoip" ]
  16. }
  17.  
  18. date {
  19. match => [ "timestamp" , "dd/MMM/YYYY:HH:mm:ss Z" ]
  20. remove_field => [ "timestamp" ]
  21. }
  22.  
  23. useragent {
  24. source => "agent"
  25. }

A sample NGINX error log:

  1. 2015/11/10 06:49:59 [warn] 10#0: *557119 an upstream response is buffered to a temporary file /var/lib/nginx/proxy/4/80/0000003804 while reading upstream, client: 66.249.88.173, server: 0.0.0.0, request: "GET /kibana/index.js?_b=1273 HTTP/1.1", upstream: "http://172.17.0.30:9000/kibana/index.js?_b=1273", host: "app.logz.io", referrer: "https://app.logz.io/kibana/index.html"

The Logstash configuration to parse that NGINX error log:

  1. grok {
  2. match => [ "message" , "(?%{YEAR}[./-]%{MONTHNUM}[./-]%{MONTHDAY}[- ]%{TIME}) \[%{LOGLEVEL:severity}\] %{POSINT:pid}#%{NUMBER}: %{GREEDYDATA:errormessage}(?:, client: (?%{IP}|%{HOSTNAME}))(?:, server: %{IPORHOST:server})(?:, request: %{QS:request})?(?:, upstream: \"%{URI:upstream}\")?(?:, host: %{QS:host})?(?:, referrer: \"%{URI:referrer}\")"]
  3. overwrite => [ "message" ]
  4. }
  5.  
  6. geoip {
  7. source => "client"
  8. target => "geoip"
  9. add_tag => [ "nginx-geoip" ]
  10. }
  11.  
  12. date {
  13. match => [ "timestamp" , "YYYY/MM/dd HH:mm:ss" ]
  14. remove_field => [ "timestamp" ]
  15. }

Thursday, November 9, 2017

Docker ELK Stack and the geo ip plugin

https://docs.docker.com/compose/gettingstarted/#step-3-define-services-in-a-compose-file

http://elk-docker.readthedocs.io/#running-with-docker-compose

# https://elk-docker.readthedocs.io/#installation
sudo docker pull sebp/elk
docker images

# https://elk-docker.readthedocs.io/#usage
sudo docker run -p 5601:5601 -p 9200:9200 -p 5044:5044 -it --name elk sebp/elk

# or setup a yml file
# create an entry for the ELK Docker image by adding the following lines to
# your docker-compose.yml file:
 
elk:
  image: sebp/elk
  ports:
    - "5601:5601"
    - "9200:9200"
    - "5044:5044"
You can then start the ELK container like this:
$ sudo docker-compose up elk


# follow the instructions to inject a log msg to log stash

# inject the msg

# in a browser view the injected msg

http://192.168.1.155:9200/_search?pretty

http://192.168.1.155:5601/app/kibana#/management/kibana/index?_g=()

# use the container id from the docker ps and stop the container

docker stop fce12628893c

docker stop
# Lets now build a elk-docker image using a git clone

cd

git clone https://github.com/spujadas/elk-docker

http://elk-docker.readthedocs.io/#building-image

https://stackoverflow.com/questions/36617904/extending-local-dockerfile

# build the cloned docker image


~/elk-docker$ docker build -t elk-docker

# now create the second docker file which will inject the geo ip plugin

A Dockerfile like the following will extend the base image and install the GeoIP processor plugin(which adds information about the geographical location of IP addresses):
FROM sebp/elk

ENV ES_HOME /opt/elasticsearch
WORKDIR ${ES_HOME}

RUN CONF_DIR=/etc/elasticsearch gosu elasticsearch bin/elasticsearch-plugin \
    install ingest-geoip
You can now build the new image (see the Building the image section above) and run the container in the same way as you did with the base image.
~$ mkdir elk-docker-geoip
~$ cd !$
cd elk-docker-geoip
~/elk-docker-geoip$ vi Dockerfile

FROM sebp/elk ENV ES_HOME /opt/elasticsearch WORKDIR ${ES_HOME} RUN CONF_DIR=/etc/elasticsearch gosu elasticsearch bin/elasticsearch-plugin \ install ingest-geoip

~/elk-docker-geoip$ docker build -t elk-docker .